Neighbourhood Statistics: User Guide
Main Content
Select one or more areas from a list
To create a table using a mix of different areas and topics click the 'Custom' link on the homepage..

.. and the 'Selecting areas and topics' screen will appear.

There are three ways to select an area.
Choose the first option 'Select one or several ready-made areas such as local authorities and electoral wards' ..
..and click the 'Next' button at the bottom right of the screen to progress to the next step.
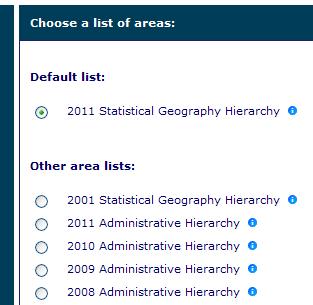
Now select the geography hierarchy area(s) from the list of differing boundary types. These are shown on the right hand side of the screen.
Statistical Geography hierarchies display Super Output Area geographies, while Administrative Hierarchies display ward level data.

Note: the default is the 2011 Statistical GeographyHierarchy, however it may that the lowest geographical detail is available in one of the alternative hierarchies, eg, select one of the Administrative Hierarchies if you wish to view ward data.
Click the 'Next' button at the bottom right of the screen.
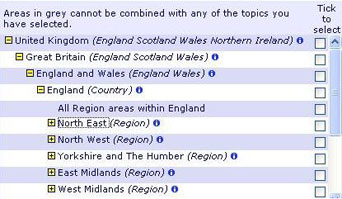
After choosing your geography hierarchy, you need to select your area(s). You have two options - use the Search facility or 'drill-down' into the relevant area name in the explorer view.
Search for an area
The first option is to enter a placename or postcode into the box provided ..

..and then clicking 'Search'.
Postcode results:
Area results relevant to your postcode are returned in a new window.

Note: The areas that we hold statistics for do not follow the boundaries for postcodes, towns etc. We recommend that you view the map (available via the link by the area name) to make sure that the matched areas are suitable.
Click on the area relevant to your choice. The area search result window closes, and you are returned to the 'Select from Geography' page.

Tick the box next to the area(s) to select them.
Note: when you make your first selection, the screen will 'refresh'. You will need to use the scroll bar located to the right of the area list to return to your chosen area to continue selecting.
Click the 'Next' button at the bottom right of the screen.
Placename results:
Area results relevant to your placename are returned in a new window. The results are viewed in a list, starting with placename and ending with the lowest geographic layer available in your selected geography.

Click on the area relevant to your search. The area search result window closes, and you are returned to the 'Select from Geography' page.

Tick the box next to the area(s) to select them.
Note: when you make your first selection, the screen will 'refresh'. You will need to use the scroll bar located to the right of the area list to return to your chosen area to continue selecting.
Click the 'Next' button at the bottom right of the screen.
Unless you have already done so, you now need to select your topics.

Finding areas using the explorer view
As an alternative to using the Search facility, you can simply drill-down into the area list.
The area list screen shows the regions of England.

By clicking on a region, the next level, local authorities, will be shown.

Continue to drill-down to the level required and tick the box next to the area(s) to select them.
Note: when you make your first selection, the screen will 'refresh'. You will need to use the scroll bar located to the right of the area list to return to your chosen area to continue selecting.
Click the 'Next' button at the bottom right of the screen.
Unless you have already done so, you now need to select your topics.
